
Original – Hello Gorgeous Theme

Thank you for choosing a Hello You Designs Theme to build your site. Don’t forget to submit your site when you are finished and please contact us if you run in to any hiccups along the way. Below are the basics on getting your new theme set up to appear like the demo. Here is a link as well to the demo that you can view for reference.
Design Basics
Below are the fonts and colors that are used throughout the theme.
Colors
Midnight – #272727
Deep Navy – #2f414a
Rose – #e1bdbd
Pink – #fff5f3
Various Grays
* Before Proceeding *
Create a backup of your current site. Always keep an untouched copy of your theme stored on your computer. You will also want to keep an updated version of your theme files stored on your computer, in the case that you accidentally make a mistake and need to use that copy to fix it. You can also download a copy in your account area at any time.
Basic Setup
Plugins used in Demo
If you plan on importing the demo content and widget file you will want to download these plugins first before doing that. If you download the demo content first and a plugin is missing that the demo uses, it will fail to import that content.
- Genesis Enews Extended– This is used for the subscribe/newsletter areas.
- Simple Social Icons– This is used for the social media icons in the sidebar.
- Soliloquy Lite– This is for the slider on the home page.
- Genesis Simple Share– This is used for the social media sharing at the bottom of blog posts.
- Portfolio Post Type – Provides the custom post type for your portfolio
- WooCommerce– This is used for the ecommerce area of the site. If you aren’t using this feature, don’t install this plugin.
- Genesis Connect for WooCommerce– This is used in conjunction with the WooCommerce plugin to work nicely with Genesis.
- Instagram Feed– This is used to show your latest Instagram feed.
- Testimonial Rotator– Displays your testimonials.
- Regenerate Thumbnails– This is used to recrop your images if all your images are oddly sized.
- Widget Importer & Exporter– This is used to import all the widgets from the demo and helps with setting up the theme for the first time.
First Steps
- Install the Genesis Framework and make sure it’s activated.
- Install the Theme and activate it.
- Install the plugins listed above before proceeding (leave off any you don’t plan to use).
- Reset permalinks. Click “Settings” in your admin menu, then permalinks, and save.
- Run the regenerate thumbnails plugin. (tools>regenerate thumbnails)
- Install XML file with demo content (only if you feel you need it).
- Install the Widget demo file (only if you feel you need it).
If you are starting from a new install you should be able to start editing the demo content with your information. If you have an active site and are switching themes, you will need to do some “cleaning up” and re-arranging of the widgets to have your theme display right. Go to Appearance > Widgets and then open each widget area and delete or rearrange the widgets that are in places they shouldn’t be.
Logo or Site Title
Text – If you prefer to use text, that will automatically appear. You can set your site name by visiting “Settings > General”
- Place your blog name in the ‘Site Title’ field
- Place your tagline in the ‘Tagline’ field
Setup your Menus

Left & Right Menu Widgets
Change Your Colors

Widgetized Homepage
Widget Areas
Homepage Widgets
- Sticky Social Icons – Holds the social icons in the sticky menu.
- Header Left – Widget area on the left side of menu.
- Header Right – Widget area on the Right side of menu.
- 5 Homepage Grid Widgets -See Layout Below
- Home Badge – A beautiful extra. The space is 175 x 175px
- Welcome Section
- Call To Action
- Home Services
- Home Featured
- Footer 1
- Footer 2
- Footer 3
- Flex Footer
- Social Bar – Full Width Social Bar
Bonus Widgets
- Portfolio Archive Widget – Displays on the portfolio page
- After Entry Widget – Displays below your posts & after your author box. Great for a call to action.(not shown in demo)
Visual Widget Guide

Flexible Widget Areas

Widgets Used in the Demo
Homepage Grid Setup & Sizes

This gorgeous grid is very size specific to acheive the clean layout that lines up perfect. The first step is to properly size everything. Use picmonkey.com or your favorite image editor. Here is the grid layout with the sizes your images, or slides will need to be. If you are placing a text widget with wording, you don’t need to worry about sizing. Just try to keep your message short & sweet so it fits in the box.

Home Grid Featured Images
* DO NOT use Jetpack to place the images in the grid. Jetpack will override the theme style sheet and look bad on certain browsers and mobile views.
When placing a featured image in the grid you need to select the Featured image size of 774×774. Notice in the example that the Genesis Featured Widget is in the “Left Large” widget area with the featured image size of “featured-images-(774×774)”. If you are using a “text” widget to insert an image link, you don’t need to worry about this. Just make sure the image is the correct size.

Image
Image that links
Home Badge
Image
Image that links
Welcome Section

Below is the code you would use to create the look in the welcome section. Keep in mind you can place any widget(s) in this spot. The demo uses a text widget that has column classes, a title box, checklists & an image. Learn more about these individual codes at the bottom of this tutorial.
Copy & Paste this code into a text widget
Call to Action
Home Services

This widget area is designed so the first widget placed does not have a border around it. While every widget after will. It allows for an intro blurb and then services boxes below. These are great for highlighting what you do or your services. To create the look in the demo you will add 4 text widgets to this spot. The 1st Text widget holds the blurb, then remaining 3 are set up like the code below.
Home Featured

These posts are placed from the Genesis Featured Post Widget and configured like below.

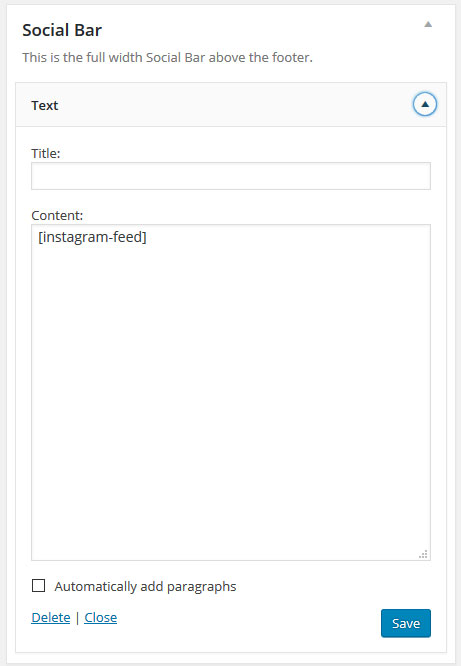
Social Bar

This is the full width social bar under the theme footer. In the demo we use the plugin Instagram Feed and place a text widget with the shortcode for the plugin in this spot.
Footer Widgets – As Seen in the Demo
READ FIRST

To get this look right it takes a little bit of planning and adjustments. You may have to play around with the best placement of widgets and the amount of text you have in each spot. If this footer widget area is too challenging or you would prefer a traditional 3 widget footer, then use the Flex Footer. The Flex Footer was designed as an alternative to this new grid style footer and can hold 3 widgets.
Footer 1

1st Widget: Stretches the full width & has a bottom border. In the demo it is a text widget with a link, using the rose accent color and cursive font.
2nd Widget: Is only 40% of the width and has a right border. The demo is using a text widget with an image that links
3rd Widget: Is 60% of the width and using a custom menu widget. Make sure your menu is the correct number of items so it does not overwhelm this spot.

Footer 2

1st Widget: Stretches the full width & has a bottom border. In the demo it is a text widget with a short blurb
2nd Widget: Is 60% of the width and has a right border. The demo is using a text widget blurb & Font Awesome icon
3rd Widget: Is 40% of the width and using a text widget with an image that links.
Footer 3

Each widget in this footer will stretch the full width of the footer. The demo is using the Simple Social Icon plugin and an Enews Extended.
Flex Footer

This footer is designed to hold 3 widgets and can be used in place of the grid style footers above. You can place just about any 3 widgets you would like in this spot. The example above is using the following…
1st Widget: Text widget with a blurb and Font Awesome icon
2nd widget: Text widget with an image that links.
3rd Widget: Genesis E-news Extended widget
Copy & Paste Codes
Title Boxes

Font Styles

Accent Colors
Rose Color

Navy Color

Check List

Insert Images
Image that links
Buttons
Pricing Table

If you are new to WordPress I highly recommend watching the WordPress Video Tutorials. Many of the questions you have will be answered in those videos. The videos are only available to clients who have purchased a theme. If you purchased your theme on Etsy or Creative Market and would like access to the Tutorial section, please contact us.
If you are unable to find your questions answered in the links above, please contact us and submit a support ticket.
Please note our support team is here to help answer questions pertaining to any Hello You Designs theme setup and installation. Any further customization to themes is not covered under our provided support.