
Custom Fonts
How to install fonts on a kadence theme
Follow the tutorial below if you are using the free version of Kadence. If you have Kadence pro, they offer a plugin to install fonts and you would refer to their install instructions
Two ways to proceed…
By Plugin
If you choose to go the plugin route, the Use Any Font Plugin will allow you to upload 1 free font. If you need more, you will need to upgrade to the Pro version of this plugin for $10.
Before you start
On the bottom tutorial
It is important to understand that installing fonts without using a plugin is going to be considered a more advanced step. This tutorial is going to assume that you know how to work in your File Manager and files. If you do not know what a file manager is, I don’t recommend you move forward with this tutorial and should consider either upgrading to Kadence Pro, using the plugin tutorial above, or reaching out for help. This is not a SUPPORT item and is considered customization. We bill $45 to add your custom fonts. As always make sure you do a backup to your site before you make changes to your site.
Step 01: Access Your Theme Folder
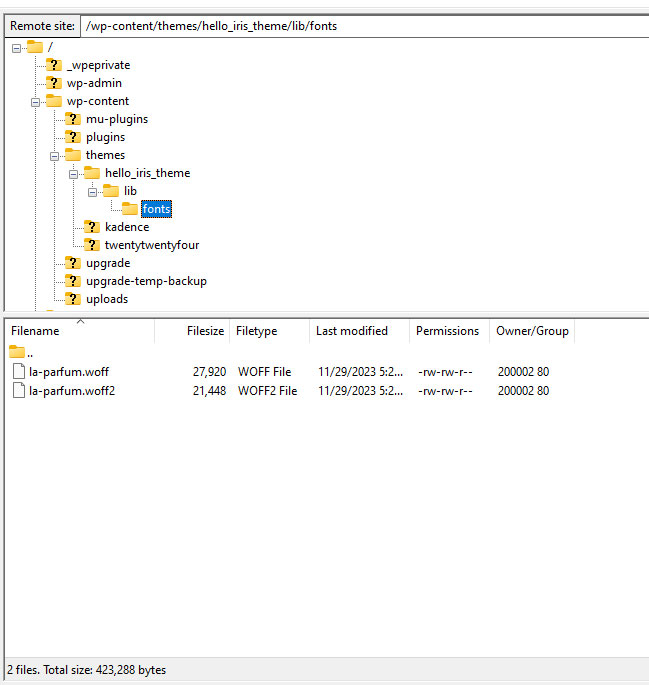
You are doing this either by your Hosting File Manager or an SFTP/FTP File Manager (like Filezilla). It is usually at public_html > wp_content > theme We are using the Hello Iris Theme for this example.
Step 02: Add Your Font
Navigate to the font folder. It is found at “Theme File > Lib > Fonts”. Then add your fonts to the “fonts” folder. If you are using a web font, add both .woff and .woff2.
** If you do not have a web font, you can convert an .otf or .ttf to a web font. CloudConvert is one available but any font converter will work. Make sure you have the right font licensing to do so.
Step 03: Add the font to your Style Sheets.
You have 2 style sheets inside of your Theme file. One controls the editor and one the front end of the site. To access your style sheets, use your File Manager or go to the WordPress site dashboard, click Appearance > Theme File Editor. From this screen you should automatically be on the Style Sheet. If not, click on the Style Sheet over on the right.
Style Sheet First…
Add the below code. This code is assuming you are adding a .woff and .woff2. Be sure to add the name of your font “YOUR FONT NAME” and replace the lar-parfum.woff and lar-parfum.woff2 with your font file name. It must be exactly as the file you loaded to the font folder. It is case sensitive.
Style.css code
@font-face {

    font-family: 'YOUR FONT NAME';
    src: url('lib/fonts/la-parfum.woff2') format('woff2'),
         url('lib/fonts/la_parfum.woff') format('woff');
    font-style: normal;
    font-weight: normal;
    text-rendering: optimizeLegibility;
    font-display: swap;
}
Next – Custom Editor Style.css
In the right of the theme editor or in your File Manger, click on “lib” then on “custom-editor-style.css” And add the following code. Make sure the family name from above matches exactly. As well as the font name that was added to the “font” folder.
Custom Editor Style.css code
@font-face {

    font-family: 'YOUR FONT NAME';
    src: url('fonts/la-parfum.woff2') format('woff2'),
         url('fonts/la_parfum.woff') format('woff');
    font-style: normal;
    font-weight: normal;
    text-rendering: optimizeLegibility;
    font-display: swap;
}
Step 04: Modify the Functions File
This is where it can be tricky and is important that you have a backup in case you mess up. Many hosts will not allow functions.php file edits in your wordpress dash. So you may need to modify this in your file manager. If you are using a Hello You Designs theme, all of our themes have custom fonts. So you will need to add your code in with the existing code.
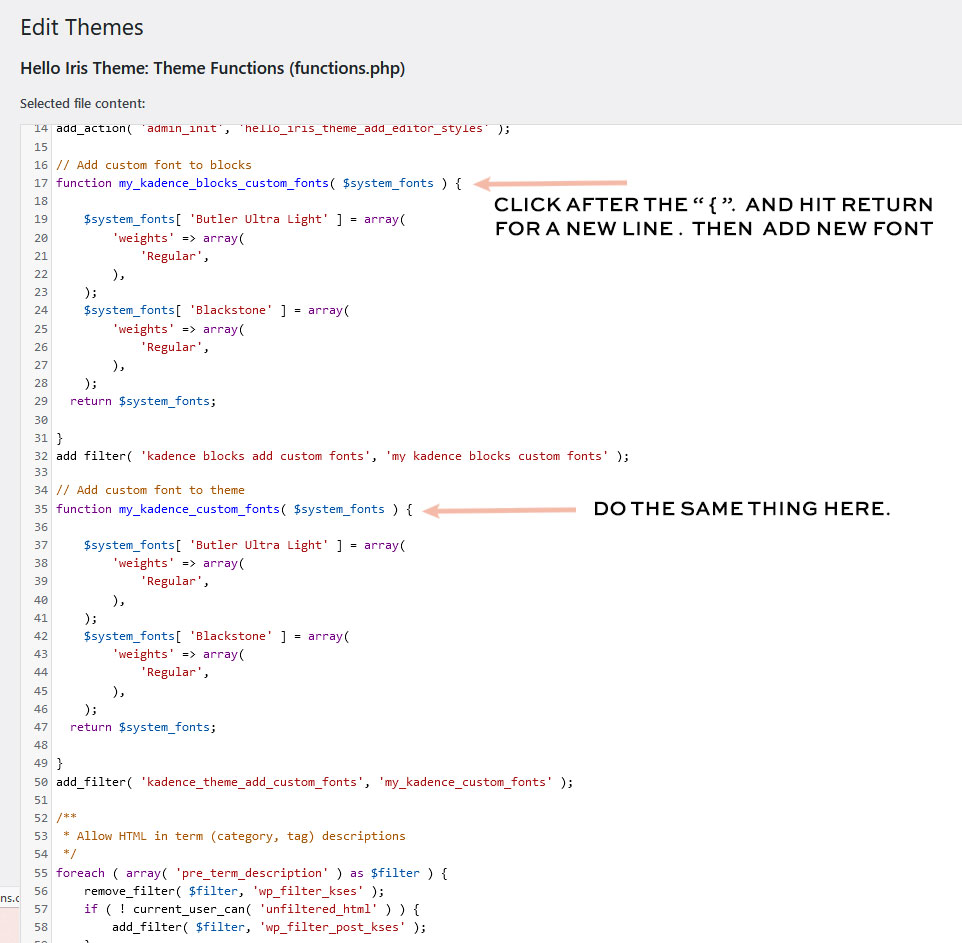
Make sure that ‘Your Font Name’ matches what you have in both of the style sheets for the “Font-Family” name. You are going to add the code to the right in two places in your functions file.
If you are adding more than one font, then you would just duplicate this code to the right. Below is an example of the Hello Iris theme and the existing fonts, plus the new font we added.
CODE TO ADD
$system_fonts[ 'YOUR FONT NAME' ] = array(
	'weights' => array(
		'Regular',
	),
);
Look at the functions file and find where it says “//Add custom font to blocks” Then follow the below image.
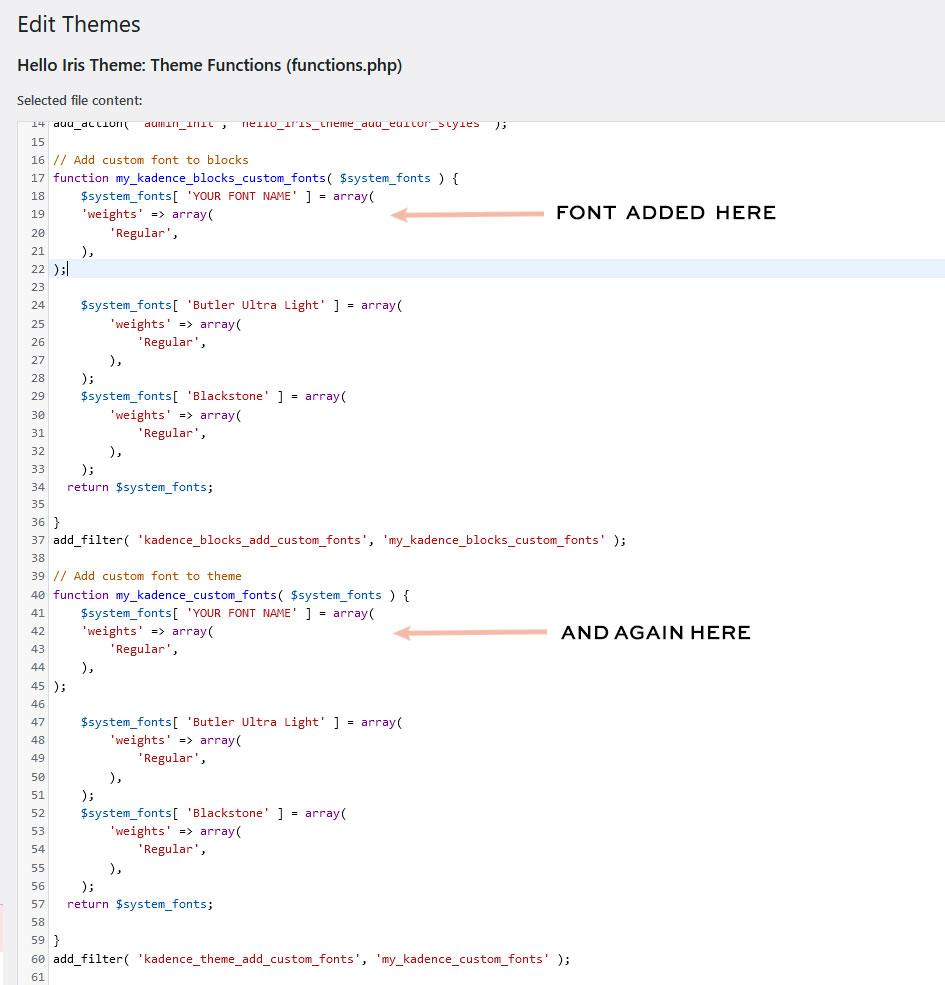
Your Functions file should look like this when done. If so, click save.
Step 05: Custom font has been added.
If you followed the above correctly, you should be done and able to access your new font from the customizer and page editor. One thing to keep in mind is that browser caches and even your host cache can hold strong and not show the changes you have made. Before you consider that the font was not added properly, be sure to clear your caches.
If clearing the caches is still not showing the font, the next step is to make sure that the font file added is the same name as the code you added to the style sheet and that the Font Family name matches on both style sheets and functions file.
If that is still not it, you have double checked everything, please reach out for help. Include your URL and a login to the site so we can view what has been done. Email is support@helloyoudesigns.com