All Kadence Themes have the same initial setup and install. To view these steps, head over here. Then when complete head back here for your theme specific tutorials.

How to Add or Remove Arches from any Image

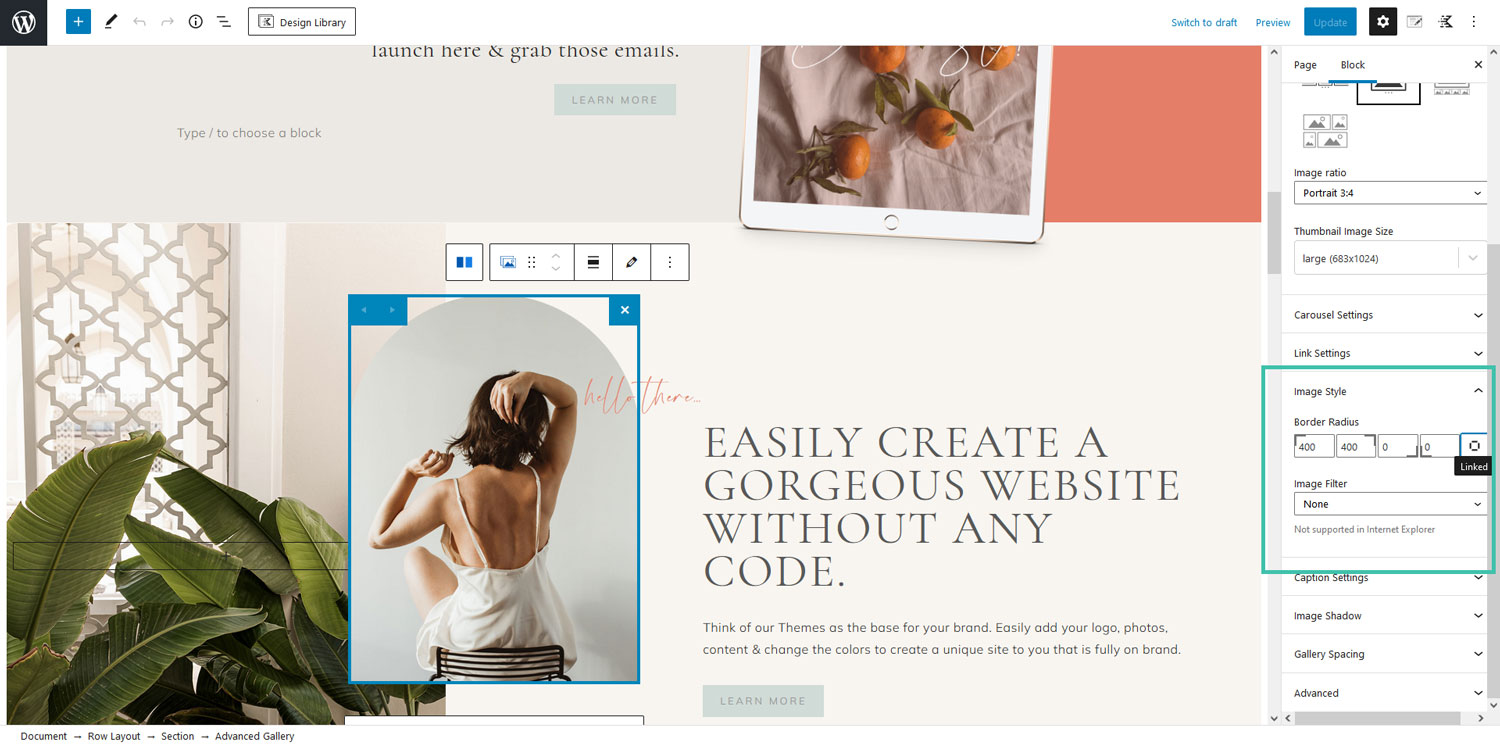
Step 1 – Click on the image you want to edit
Step 2 – Over on the right in the editor open the Image Style Tab and Click the Square
Step 3 – REMOVE THE ARCH Change the numbers in space one and two to 0.
Step 3b – ADD AN ARCH – Add your image width to the first and second place like in the screenshot. If your image is wider you will need to increase the number. Play with it until you get the desired arch effect.

General Tips For All Kadence Themes

Anywhere you find a video or slide section, you can easily change that to be a single image, slide, or video.

Step 1 – Select the entire block then open the Background Settings Tab on the right

Step 2 – If you want to keep what is currently in that block simply replace the content with your own

Change Content Type

Step 2B – If you want to change a video to a Slider (or vice versa) remove the content there by clicking the X.

Step 3 – Then click on the type of content you want, single image, slider or video and add your content.

Step 1 – Select the Block that you want the button to go to. You need to name this block. Over on the right scroll down to the Advanced Tab. If you do not see it, you have not selected the entire block or row.

Step 2 – In the Advanced Tab is an option for HTML Anchor. Name your block something simple that makes sense and be sure to remember what it is. Example – yourblocklink

Step 3 – Go to the button you want to add the Anchor link to and add your new Anchor. It will always be #yourblocklink It is only a # then the block name. Adding anything else to it and it will not work.

If you want to add a link to an anchor on a different page, you can do so by adding the link, then at the end your anchor. Example

https://yourdomainhere.com/thepage/#yourblocklink

Almost every newsletter provider will allow you to create a form and then embed it on your site. You will want to refer to your providers instructions on how to create the form and then get the code that is needed for your site. Once you have done that, you use a Custom HTML block and paste your form code into the block.

STYLING – The styling of the form will depend on what you have done when creating it, and what your provider adds to the code. It may match the theme perfectly and take on the theme styling, or you may need to modify it to match. This is not theme support.

INSERT HEADER/FOOTER SCRIPT FORMS – To add a form to your header or footer spot you will want to download the plugin Insert Header Footer Scripts. After you activate the plugin you can add the script to the appropriate spot.

If you plan on using the Custom Blog page as your blog page, you will need 2 blog pages. 1 is your custom page that you create, the 2nd is the traditional blog roll or archive. The reason for this is WordPress automatically filters posts to an assigned page. This will override any customizations you have on that page. So create your custom blog page and assign that in your menu. Then create a second page and go to Settings > Reading > and assign this page to your blog page. Having this second blog page in the settings allows your site to have pagination, or show more than one page of posts.

The tutorial for this can be found here.