All Kadence Themes have the same initial setup and install. To view these steps, head over here. Then when complete head back here for your theme specific tutorials.

MEET JENNIFER

Transparent Logo & Navigation Settings

Sometimes when you do the import, the header does not pick up the correct settings for the transparent header. This is an easy fix.

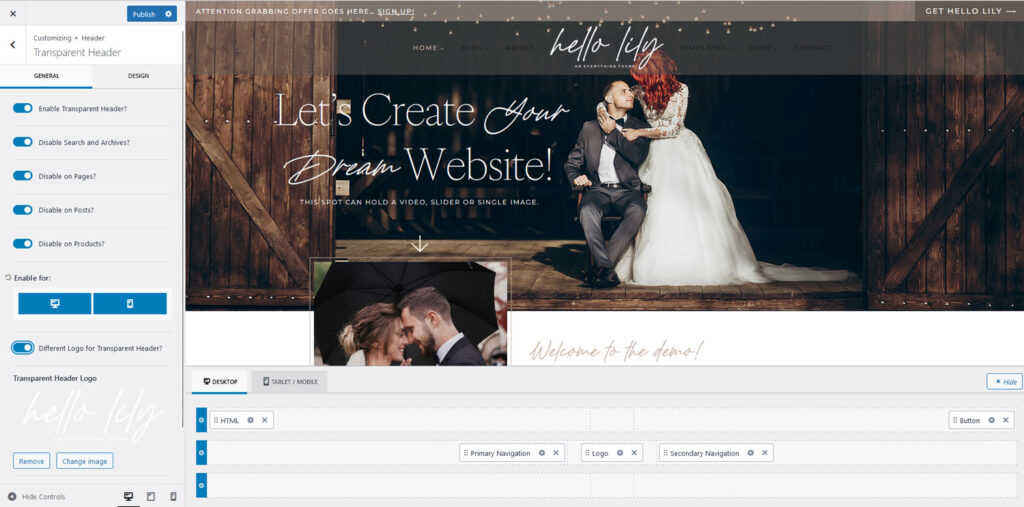
STEP 1 – Go to Appearance > Customizer > Header > Transparent Header
STEP 2 – Click Enable Transparent Header
STEP 3 – Click Disable on Pages, Disable on Posts, and Select Different Logo for Transparent Header

By disabling on all pages and posts, you will be able to select what pages get the transparent header in the page/post options when creating that page or post. If you want it on all pages and posts by default, you will need to modify the page and post space settings to accommodate this.

From this screen you can now load in your custom logo that will show when the transparent header is showing. If you do not want a different logo to show, you can turn that off. To change your regular logo, you would go back to the header settings.

STEP 1 – Click on the design tab. This will let you set the navigation and background colors.
STEP 2 – Change the navigation colors. The first one is the main color, Hover color, then Active color.
STEP 3 – Adjust the navigation background color. We selected it to be the brown in the palette with a 50% opacity.

*** If you change your palette colors, and want the menu background to be the new color with transparency, you will have to go back and manually change this. Because you adjusted the color shown to a transparent color, it will not automatically change with your settings.

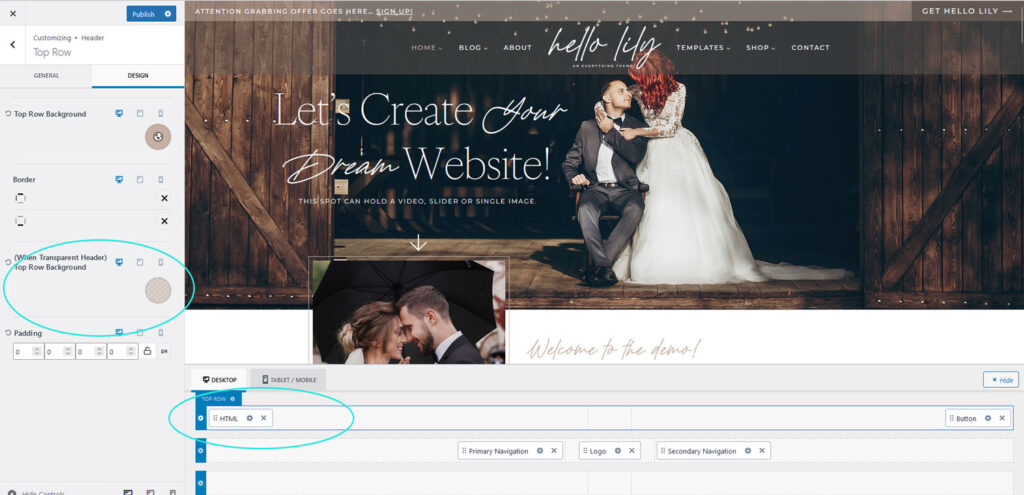
STEP 1 – Click on the blue gear icon, for the top row.
STEP 2 – Click on the design tab
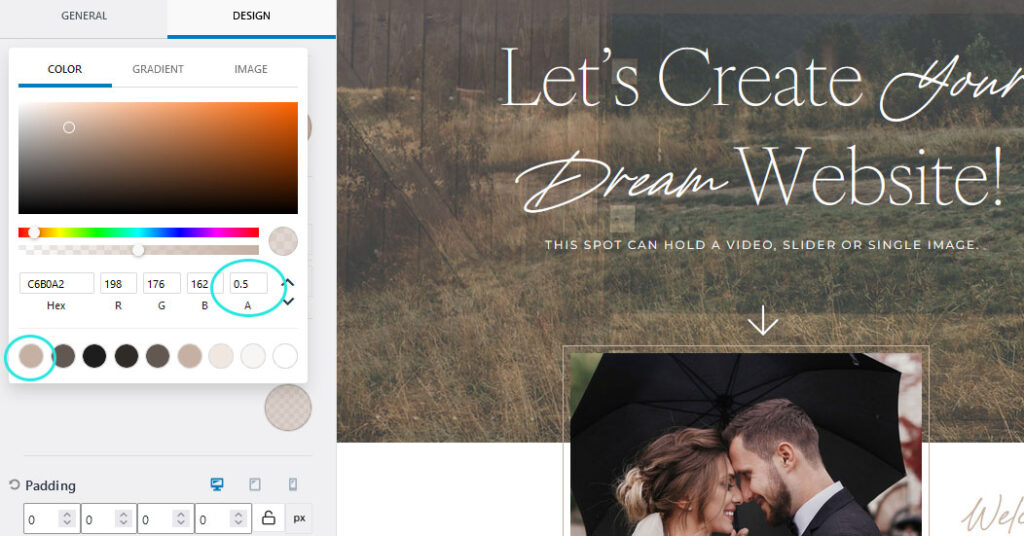
STEP 3 There you can select the color from your palette for the top row and assign a transparency to it. Demo is using the mauve with a 50% transparency

*** If you change your palette colors, and want the top row to be the new color with transparency, you will have to go back and manually change this. Because you adjusted the color shown to a transparent color, it will not automatically change with your settings.

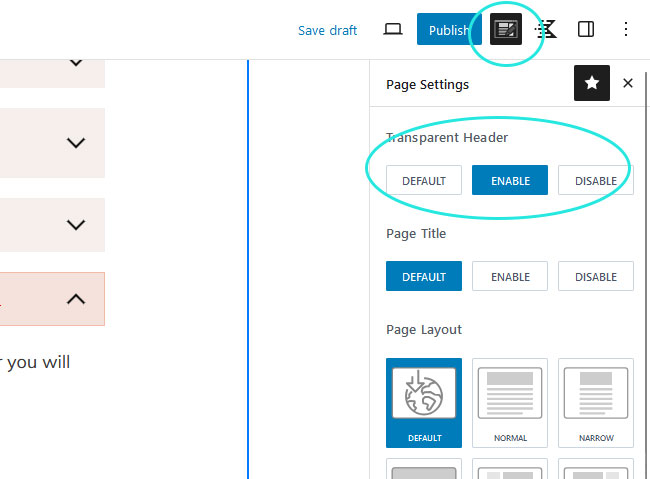
When you are in the page or post editor, in the top right corner you will click the notepad with pencil icon. Then select “Enable” where it says Transparent Header.

When you do this it is important to remember that whatever your first block is, will need proper padding so you do not have the content run into the header. A good padding setting is 10-12 EM. If you are using a block from the library, it will already have the top padding set.

Category & Tag Archives

You can create a custom description for both your Category and Tag archives. The theme allows HTML in the description spot.

Step #1: Go to Posts > Click on Categories or Tags > Then click Edit on the archive you want to add a description to.

Step #2: In the Description box, add your description. If you would like to add links, it will need to be with HTML. The Span below will default to your header font and the links to your Primary Navigation font. Copy/paste as many of these as you like.

Title: You may also love….

<span>You may also love...</span> 

The Link code: Notice the · at the end. Remove for your last item, or change to something different for a spacer.

<a href="YOUR LINK GOES HERE"> Dessert </a>  ·  

Full Demo Code:


<span>You may also love...</span> <a href="YOUR LINK HERE"> Dessert </a>  ·  <a href="YOUR LINK HERE"> Dinner </a>  ·  <a href="YOUR LINK HERE"> Drinks </a>
MEET JENNIFER

Advanced Styling Options

Rotate any image by adding lily-rotate to the Additional CSS spot in the theme.

STEP 1 – Click the Image you want to roate
STEP 2 – Over in the editor on the right, click the “Advanced” tab and scroll down to Additional CSS.
STEP 3 – Add lily-rotate to the additional CSS spot

We added this code because a line border does not work on ratio images, or gallery images.

STEP 1 – Click the image you want to add it to.
STEP 2 – Over in the editor on the right, click the “Advanced” tab and scroll down to Additional CSS.
STEP 3 Add lily-img-border to the additional CSS spot

Site Credit

Many of you are signed up as an affiliate for the theme shop. We have included a Site Credit template to help with this. You can link this page in your footer, then change the button, and other links to your affiliate link.

If you are not already signed up as an affiliate and would like to be, you can do so here. We can also create a unique coupon code with your name, or blog name.

General Tips For All Kadence Themes

Anywhere you find a video or slide section, you can easily change that to be a single image, slide, or video.

Step 1 – Select the entire block then open the Background Settings Tab on the right

Step 2 – If you want to keep what is currently in that block simply replace the content with your own

Change Content Type

Step 2B – If you want to change a video to a Slider (or vice versa) remove the content there by clicking the X.

Step 3 – Then click on the type of content you want, single image, slider or video and add your content.

Step 1 – Select the Block that you want the button to go to. You need to name this block. Over on the right scroll down to the Advanced Tab. If you do not see it, you have not selected the entire block or row.

Step 2 – In the Advanced Tab is an option for HTML Anchor. Name your block something simple that makes sense and be sure to remember what it is. Example – yourblocklink

Step 3 – Go to the button you want to add the Anchor link to and add your new Anchor. It will always be #yourblocklink It is only a # then the block name. Adding anything else to it and it will not work.

If you want to add a link to an anchor on a different page, you can do so by adding the link, then at the end your anchor. Example

https://yourdomainhere.com/thepage/#yourblocklink

Almost every newsletter provider will allow you to create a form and then embed it on your site. You will want to refer to your providers instructions on how to create the form and then get the code that is needed for your site. Once you have done that, you use a Custom HTML block and paste your form code into the block.

STYLING – The styling of the form will depend on what you have done when creating it, and what your provider adds to the code. It may match the theme perfectly and take on the theme styling, or you may need to modify it to match. This is not theme support.

INSERT HEADER/FOOTER SCRIPT FORMS – To add a form to your header or footer spot you will want to download the plugin Insert Header Footer Scripts. After you activate the plugin you can add the script to the appropriate spot.

If you plan on using the Custom Blog page as your blog page, you will need 2 blog pages. 1 is your custom page that you create, the 2nd is the traditional blog roll or archive. The reason for this is WordPress automatically filters posts to an assigned page. This will override any customizations you have on that page. So create your custom blog page and assign that in your menu. Then create a second page and go to Settings > Reading > and assign this page to your blog page. Having this second blog page in the settings allows your site to have pagination, or show more than one page of posts.

The tutorial for this can be found here.

Quick videos using Iris…